|
- Basic operations -
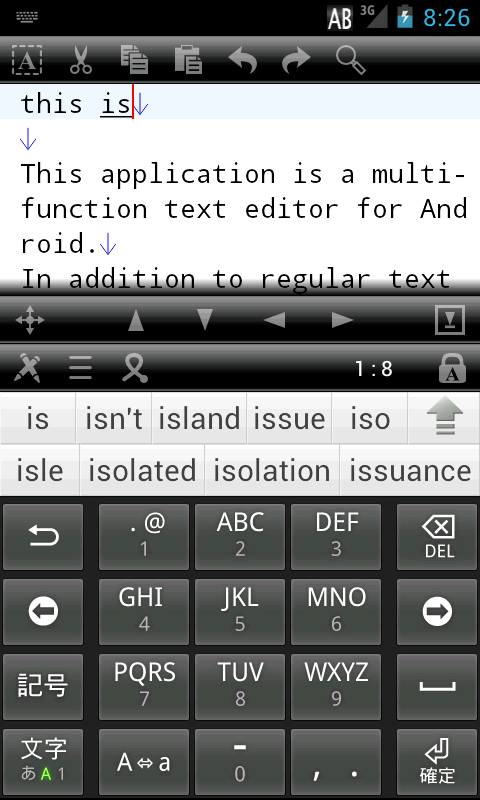
- Input screen -
An input screen opens when start application.
There are the following bars and area to the input screen.
-
Tool bar -
It is the bar that buttons displayed by the screen upper part formed a
line.
For more information, please see "here".
-
Status bar -
It is the bar that line number, letter position displayed by the screen
lower part formed a line.
For more information, please see "here".
-
Search/Replace bar -
It is the bar that buttons of the search feature that is displayed next
to tool bar when use search feature formed a line.
For more information, please see "here".
-
Cursor buttons bar -
With a button bar is used to move the cursor.
For more information, please see "here".
-
Text input area -
It is a area performing text inputting in the screen center.
- Basics of the input -
- Launch of
IME -
It is necessary to start IME(Software keyboard) to input a text.
Push the center key (including the D-Pad) to launch IME or tap the text
input area.
Note: The alphanumeric character input is possible without using IME at
the terminal with the hardware keyboard.
- Finish of
IME -
Push the Back key to terminal to terminate IME which launched.
- Input key -
In the case of the terminal with the hardware keyboard, can input alphanumeric
characters by pushing the key. It is necessary to start IME when input
other contents.
- Key operation
-
Please refer to "here" for
the operation method of the key.
- The lock of
the key -
There is an effect same as the operation that is pushing each key at the
time of the next key input when push Shift key and the Alt key once.
Lock can do it twice when push it. When locked it, it was locked until
pushed each key again.
Because IME operates it when IME starts, the lock of the key may be different
in some movement.
- Attention
of the key input -
Please refer to "here"
for the matters that require attention of the key input.
- Edit text -
- The move
of the cursor -
A character is inserted in the cause at the time of the character input
at the position of the cursor.
There are key operation, a method by the touch operation to move a cursor.
-
Move by the key operation -
The move of the cursor by the key operation uses a top and bottom, right,
left key basically.
Please refer to "here" for
the key operation except the top and bottom, right, left key.
-
Move by the cursor button operation -
You can move the cursor using the cursor buttons on the button bar.
After you press the lock button on the far right you can do the same
as Home / End keys.
-
Move by dragging -
"Dragged mode" button can be switched on / off mode and drag to move.
You can move the cursor in the same direction as the drag from the cursor
to move when on the button bar.
-
Move by the touch operation -
Can move a cursor when drag the cursor pointer which is displayed when
tap two times of screens or tap it slowly.
- Range
select -
The range of choice, have the following text.
Note: It is necessary to do range select when cut or copy a text and do
it.
- Select-mode
-
Shown a constant schedule a cursor pointer when turn on a choice mode.
Can select a character by moving a cursor pointer.
Can select it by moving a cursor with top and bottom, right, left keys
as well as a cursor pointer.
The Select-mode can change the on/off of the Select-mode by pushing
the Select-mode change button in the left edge of the tool
bar.
But it is turned off automatically when cut it or copy it or paste and
did a selection.
-
Selection by pressing and holding -
Two pointers for the selection cursor will be displayed when you press
and hold the edit area. You can change the selection by moving the cursor
while the cursor either pointer displayed.
If the cursor pointer disappears, pointer cursor is displayed for selection
by holding down the editing area again.
* Will be changed to cursor pointer for drag and drop and to hold further
in view of the cursor pointer for selection.
* If you want to erase the cursor pointer for the selection, tap a location
other than the cursor pointer.
-
Select by the key operation -
Can select it in the state that pushing the Shift key or locks Shift
key by pushing the top and bottom, right, left keys.
You can also select by tapping the edit area.
In the case of choice when lock Shift key, there is a possibility that
cannot use it when IME starts.
-
Select by the tap operation -
Tap the same word twice (double tap), then select the word.
Tap the same word three times (triple tap) then select the entire line.
Note: In either case, Select-mode, Shift key is disabled.
-
Select by the center key push operation -
Select the word and press the Center key twice in the same position.
Select the line three times and press the Center key at the same location.
Note: In either case, Select-mode, Shift key is disabled.
-
Select by the key and the tap operation -
You can select by tapping the screen and hold down the Shift key.
If you are locking down the Shift key when you launch the IME may not
be available.
- Drag and
drop -
You can move to another location selected text range.
After selecting the text, switch to drag and drop editing mode, press
and hold the area. Cursor appears drag the cursor position pointer for
the same time.
Move the currently selected text to the specified location and tap on
the cursor or pointer to specify an insertion point for the drag and drop.
To cancel a drag & drop mode, tap the text selection.
- Cut -
Cut the selection area of the text and paste it on a clipboard.
Push the "Cut" button of the tool
bar or can use it in shortcut key.
- Copy -
Copy the selection of the text and paste it on a clipboard.
Push the "Copy" button of the tool
bar or can use it in shortcut key.
- Paste -
Paste the contents of the clipboard on the cursor position. But cannot
use it when a clipboard does not have a text.
Overwrite when select a text.
Push the "Paste" button of the tool
bar or can use it in shortcut key.
Note: Because use the clipboard that Android provides, paste the contents
which copied in other application and can paste the contents which copied
adversely in other application.
- Undo -
Return one contents which edited.
Push the "Undo" button of the tool
bar or can use it in shortcut key.
The number of times that can return is basically infinite, but depends
on the quantity of terminal main memory.
- Redo -
Perform a redo of one contents which returned.
Push the "Redo" button of the tool
bar or can use it in shortcut key.
- Jump to line
-
A cursor jumps in an appointment line when appoint line number.
Push the "Jump to line" button of the tool
bar or can use it in shortcut key.
A "Jump to line" dialog is displayed at time using this function.
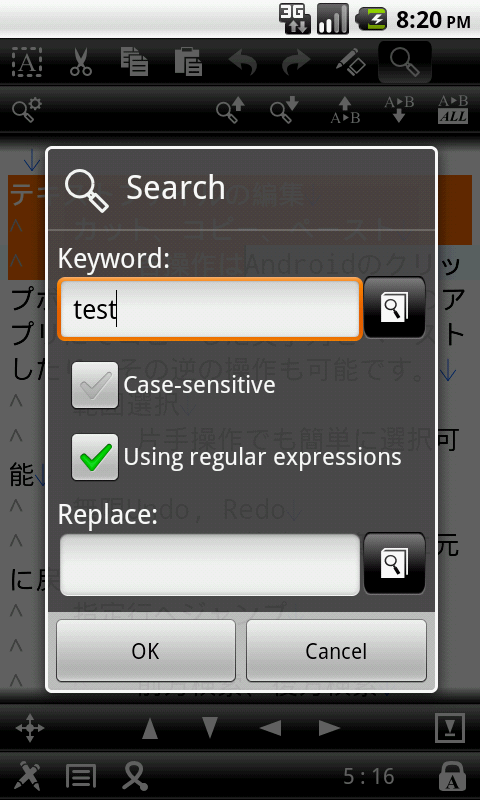
- Search
& Replace -
A "Search/Replace condition input" dialog and a search bar are
displayed, and a search and the replace of the text are possible.
Push the "Search" button of the tool
bar or can use it in shortcut key.
When push the "Search/Replace" button again after having closed
"Search/Replace condition input" dialog or use shortcut key,
a search bar is non-displayed.
Please refer to "here" for the
details of the Search/Replace bar.
- Search -
After having input keyword in a "Search/Replace condition input"
dialog of the Search/Replace bar can search by pushing the "Search
next" button or the "Search previous" button.
A "Search condition input" dialog opens when push the "Search
settings" button in the left edge of the Search/Replace bar.
-
Search condition -
Can keep a condition whether or not distinguish a capital letter small
letter of the keyword from keyword.
"Search/Replace condition input" dialog has the search condition.
- Replace
-
Replace it with replace text after a search in the keyword which input
into a "Search/Replace condition input" dialog.
Replace is possible when push the "Replace next" button or
"Replace previous" button of the search bar.
"Replace All" can replace all occurrences by pressing the appropriate
button.
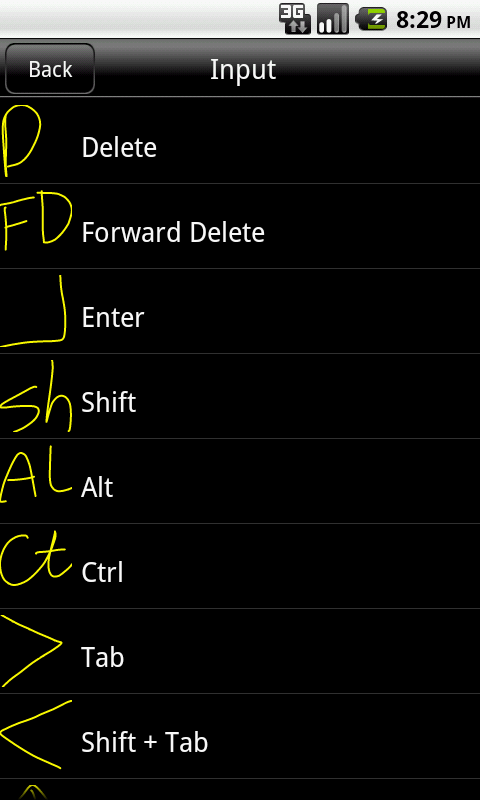
- Shortcut
key -
Shortcut key is various key sequences to operate it. Efficiency such as
the editing improves by using it.
Please refer to "here" for the
usable shortcut key.
In addition, can change the shortcut key combination from a Shortcut
key settings screen.
But the key which is not usable exists at the time of the IME start.
- Insert -
Registration text, date, time can be inserted.
- Conversion
-
You can convert to Uppercase / Lowercase , Half width / Full width.
- Gesture -
The following features can be entered only by gestures.
Gesture features in detail, please click here.

- Menu -
A menu is displayed when push the menu button.
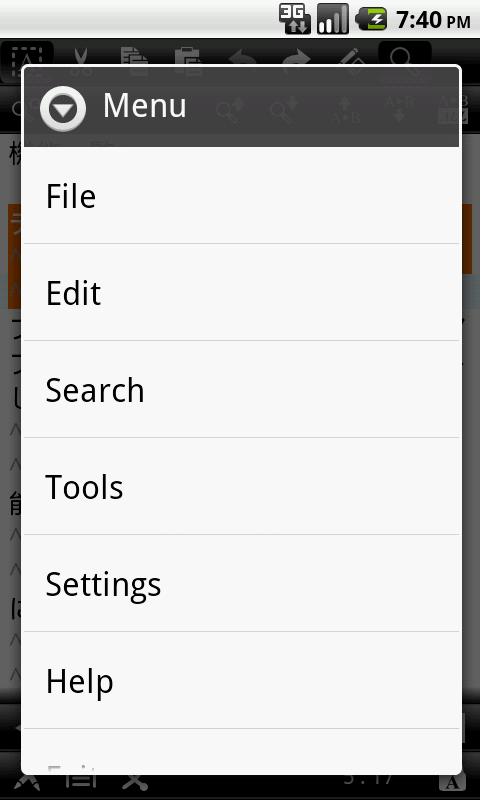
- File -
Open the File menu lists.
The File menu has the following list.
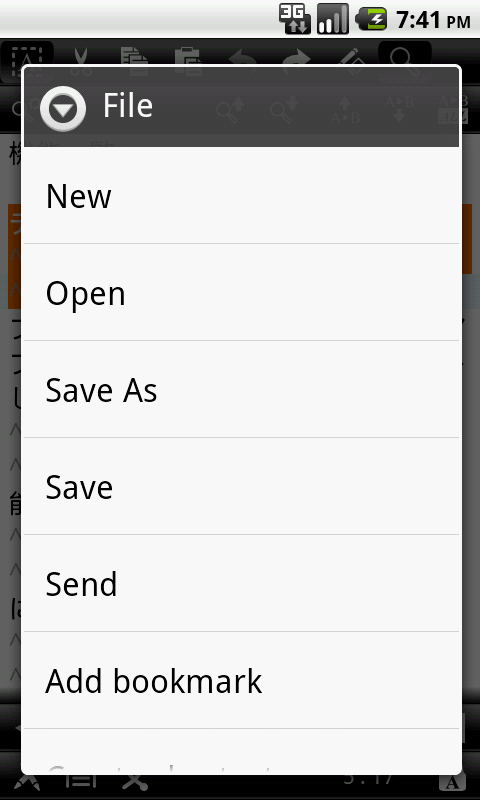
-
New -
Close an opening file and make a text newly.
When the text which edited earlier is not saved, a save confirm dialog
opens.
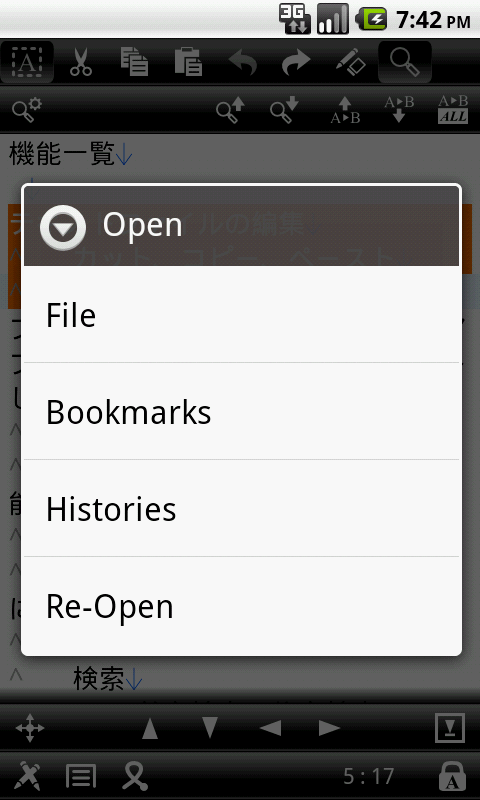
- Open
-
An "Open" list opens.
The items on an "Open" list are as follows.
-
File -
A file select screen is displayed and select a opening file.
Can change the character code when open by pushing the "Character
code" button in the lower right of the file select screen.
The default "Auto detect", but character code distinction
may not be made have few texts. When it looks like it, UTF-8 is used.
-
Bookmarks -
You can open the file / folder from the bookmarks.
If the file can not open the specified file.
If the folder is a file selection screen is open the specified folder.
Bookmark management is done from the Bookmark
Settings screen.
-
Histories -
A list of files which have opened opens so far. Opened a file with
the character code which used last when choose an item.
When opened by file appointment or when named it and saved it, it
is registered with a history.
When a designated path does not have a file, a history delete confirm
dialog is displayed and can delete it from a history list.
It is possible for the clear of the history from a basic
setting screen.
-
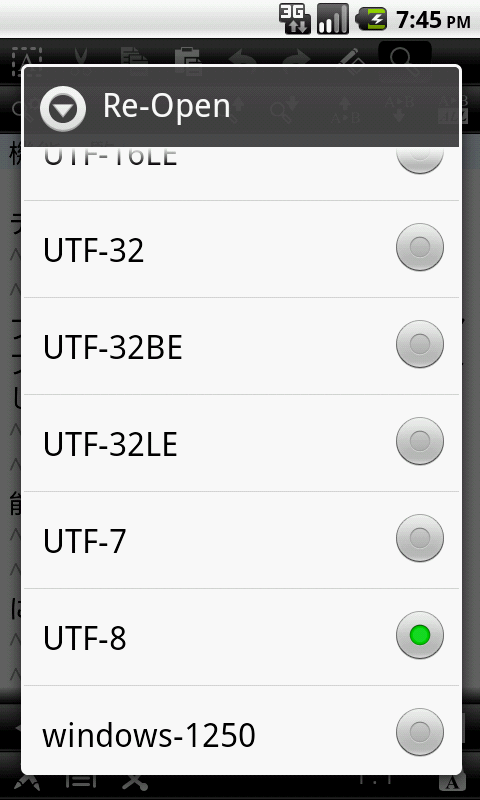
Re-Open -
Reopen the file with the specified character code.
-
Save -
Save a current text.
When it is already saved, write the top and save it.
When it is not saved, name it and save it.
-
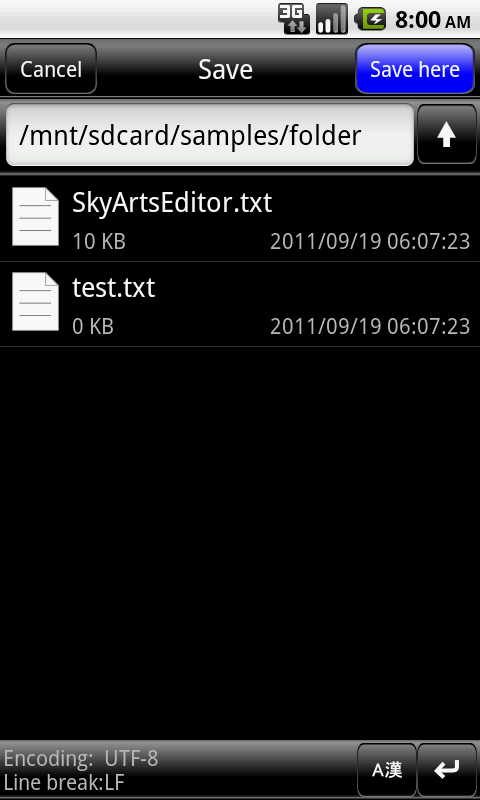
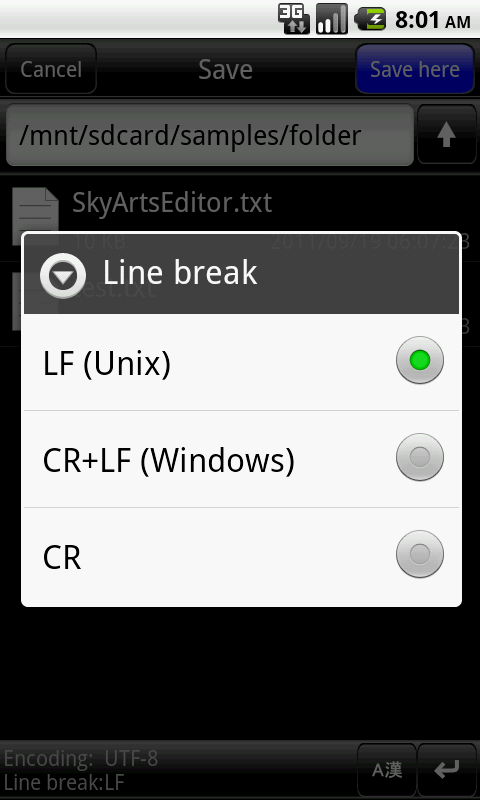
Save As -
Name a text and save it.
A folder choice to save screen opens when choose this item. Choose a
folder and can save it when input a file name.
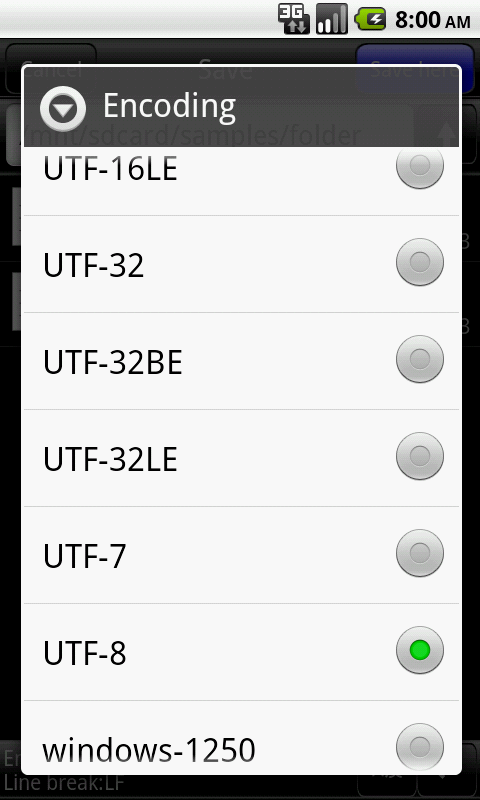
A character code to use in the lower part of the screen, a line break
code are displayed. When you want to change it, push a "Character
code" button, the "Line break code" button each, and
please choose it.
As for the character code of the default, UTF-8, the line break code
are LF.
-
Send -
Sends the current text to external application(such as mailer). If you
send a mailer might become an attachment.
Because it is necessary to be saved as a file, a save confirm dialog
is displayed when it is not saved.
-
Add bookmark -
Bookmarks the currently open file.
-
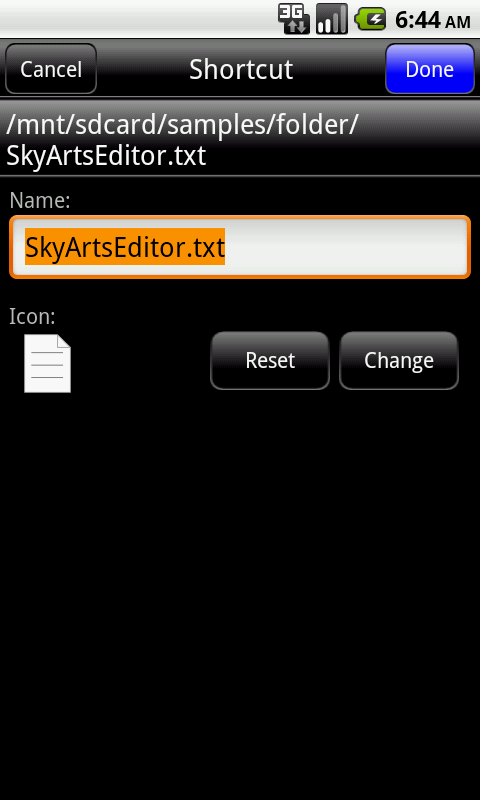
Create shortcut -
Create the shortcut icon of the file which there is to the home screen
now.
Because it is necessary to be saved as a file, a save confirm dialog
is displayed when it is not saved.
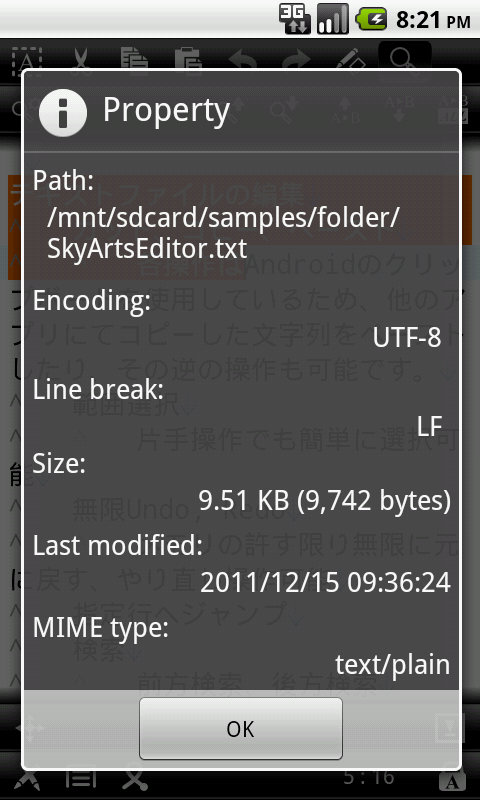
- Property
-
Display the property of a opening file now.
- Edit -
A list of editing opens when choose "Edit" menu.
The items of the list of editing are as follows.
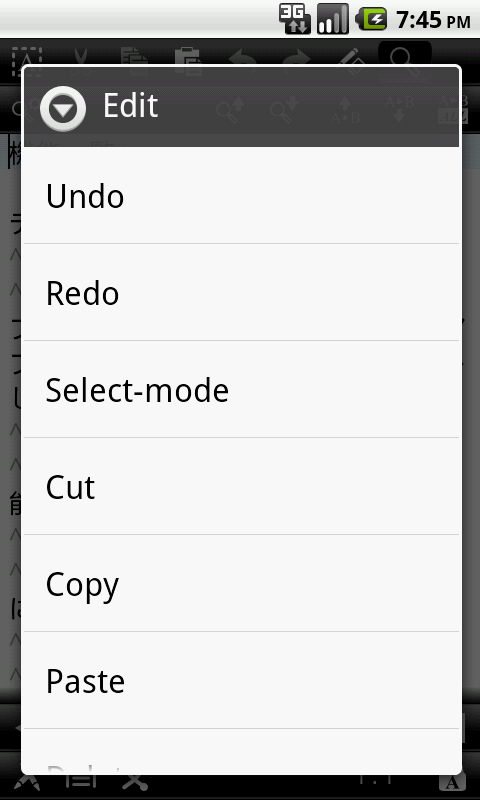
-
Undo -
Return one contents which edited.
-
Redo -
Perform a redo of one contents which returned.
-
Select mode -
Change the on/off of the Select-mode.
Shown a constant schedule a cursor pointer when turn on a choice mode.
Can select a text by moving a cursor pointer or a cursor at the time
of on.
Selct this menu again to turn it off. But it is turned off automatically
when cut or copy, delete a selection area.
- Cut
-
Cut the text of the selection area and paste it on a clipboard.
-
Copy -
Copy the text of the selection area and paste it on a clipboard.
-
Paste -
Paste the contents of the clipboard on the cursor position.
But cannot use it when a clipboard does not have a text. Overwrite when
selected a text.
-
Delete -
Delete key (Forward Delete) to the same behavior when you press.
-
Select All -
Select all texts.
-
Jump to line -
A cursor jumps in an appointment line when appoint line number.
-
Send text -
An "Send text" list opens.
The items on an "Send text" list are as follows.
-
All text -
Sends the all text to the external application.
-
Selected text -
Sends the selected text to the external application.
-
Regist text -
Can be registered by "Insert text
setting screen" the selected text.
Text that have been registered, you can use "Insert
text" feature.
-
Select -
An "Select" list opens.
The items on an "Select" list are as follows.
-
Select word -
Select the word at the cursor position.
-
Select line -
Select the line at the cursor position.
-
Selected range info -
Displays the number of characters in the selected range, the number
of lines, starting position, the end position.
-
IME lock -
You can show / hide the IME.
-
Input method -
A change of IME is possible.
- Search/Replace
-
Show / hide the Search / Replace bar.
If show the Search / Replace bar, will be displayed Search / Replace conditions
input dialog .
"Case-sensitive" and "Using regular expressions" are mutually exclusive.
If you specify both the "Using regular expressions" takes precedence.
- Tools -
"Tools" menu when you select the Tools select list.

The tool list item is as follows.
-
Cursor buttons -
Hide / show the cursor button
bar.
-
Insert Tab-
Insert a tab character at the cursor position.
-
Insert Text -
Opens a list of text that is registered, you can insert the text. Increase
efficiency will be used to register and edit the text to be used frequently
and are harder to type a character.
-
Insert Date -
Insert the current date.
-
Insert Time -
Insert the current time.
-
To Lowercase -
Convert selection to lowercase letters.
-
To Uppercase -
Convert the selection to uppercase letters.
-
To Half width-
Converts single-byte characters in the selection.
-
To Full width -
Converts double-byte characters in the selection.
-
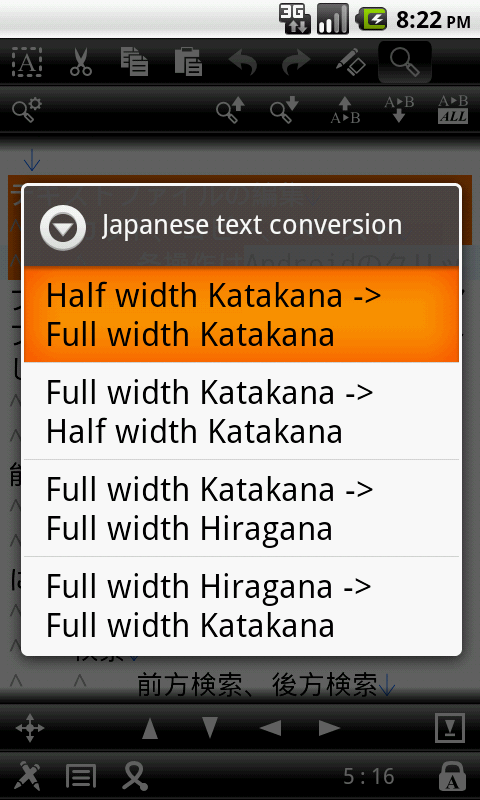
Japanese text conversion -
Displays a list of Japanese text conversion.
The list of Japanese text conversion has the following items.
-
Half width Katakana -> Full width Katakana -
Converts the half width Katakana to full width Katakana characters.
-
Full width Katakana -> Half width Katakana -
Converts the full width Katakana to half width Katakana characters.
-
Full width Katakana -> Full width Hiragana -
Converts the full width Katakana to full width Hiragana characters.
-
Full width Hiragana -> Full width Katakana -
Converts the full width Hiragana to full width Katakana characters.
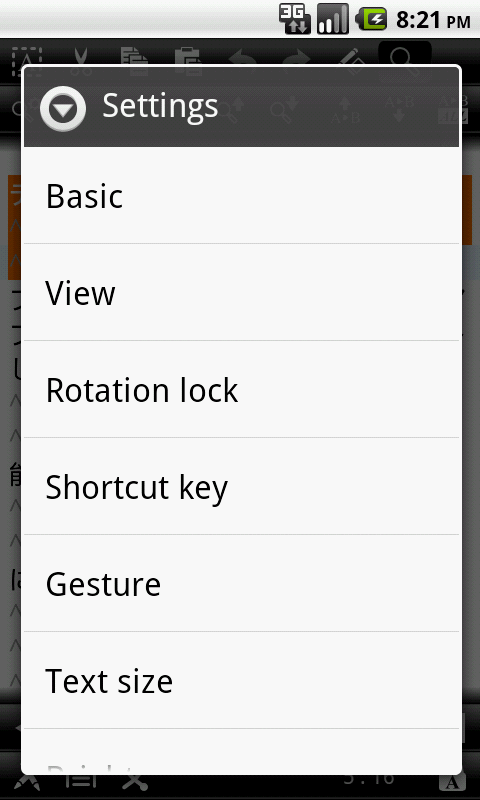
- Settings
-
A list of settings opens when choose a "Setting" menu.
The items of the settings menu are as follows.
Please refer to "here" for the details.
-
Basic -
A basic setting screen is
displayed and has basic setting, the clear of data saving.
-
View -
A view settings screen is
displayed, and setting of the indication such as a tab indent, a font,
the color is possible.
-
Rotation lock -
You can lock / unlock the screen by rotating the orientation of the
terminal.
-
Shortcut key -
A shortcut key setting
screen is displayed and can set the allocation of the key to shortcut
key.
-
Gesture -
A gesture setting screen
is displayed, you can set a variety of gestures.
-
Function call -
A function call settings
screen is displayed, you can set a variety of function call.
-
Text size -
A text size setting dialog
is displayed and can set the size of the text with values from 1 to
100.
-
Brightness -
A brightness setting dialog
is displayed and can set the brightness of the screen.
In addition, there are few changes depending on a terminal or there
may not be a change.
-
Bookmarks -
Bookmarks setting screen
appears, you can set a bookmark.
-
Insert Text -
Insert Text setting screen
appears, you can configure the text.
- Help -
Display a help.
- Exit -
Finish application.
When a text is not saved, a save confirm dialog opens.
- Terminate application -
Push the "Back" key or choose an "Exit" menu to terminate
application.
When a text is not saved, a save confirm dialog opens. When there is not
content to save, it is just finished.
- File/Folder management
function -
There is a function to manage a file and the folder to the file select
screen and folder select screen.
Please refer to "here" for the
details.
|